Tuesday 22 July 2014

Strawberry and Elderflower Ice Cream recipe.....


In between telling you about my craft room I thought I would share some of the other things I've been up to.

I manage to beat the blackbirds to the most of the berries in my garden this year! I net some of the bushes but if I leave the tiniest gap they are in there when I'm not looking. I hang CD's around but I think they just check they haven't got berry juice on their faces in them!
When I went down a few weeks ago I thought a tiny bird had got trapped under the frame of netting over the strawberries & was panicking because I'd caught him red handed. But, as I bent down to lift the frame up it squeezed through less than an inch square hole in the net. It wasn't trapped at all. Cheeky thing! Not sure what bird it was. I'll have to buy even smaller holed net next year.

My soft fruit garden
Although my soft fruit is coming to an end this is what I did about 3 weeks ago with some of my strawberries.

We have quite a large strawberry patch which produce a bowlful every other day during the season. We all love strawberries in our house. I usually make scones but my youngest said he fancied some strawberry ice cream for a change.


I'm all for quick recipes and shortcuts as I don't want to be stuck in the kitchen on beautiful sunny days. I don't have an ice cream maker so I found a Strawberry Ice Cream recipe online that seemed quite straight forward without one.

The recipe says to make a sugar syrup first. This was going to take awhile to make & time to allow it to cool down so I thought.....I wonder if my Elderflower syrup I made in May would do? So, I gave it a go.


This is my Strawberry and Elderflower Ice Cream recipe -


1 lb (500g) strawberries roughly chopped
175 ml elderflower syrup (homemade using 1kg sugar approx 30 heads & 1 1/2 ltr water 3 lemons)
300 ml whipping cream

Blend strawberries with a Braun hand held blender.


Mix with elderflower syrup.
Whip cream until it holds it shape.


Fold strawberry mixture into cream.


Pour into freezer container & freeze.


When it starts to set around the edges (approx 1 hour) pour back into a bowl and whisk.Return to freezer. Approx every hour fork the frozen outer edge towards the middle and mix. Repeat a couple of times until evenly frozen. Keep in freezer until required allowing about half an hour to soften before serving.

Ta da!


This is quite a hard setting ice cream. Mine turned out a bit "icy" but when allowed to thaw it smoothed out a bit. I think I should have whisked a few more times rather than forking it. It got the thumbs up from a teenager so it couldn't have been all that bad!


I might make it again but try it with raspberries next time.

Zx

Monday 14 July 2014

The creation of My Craft Room - Part 2 - Storage


The next stage of my craft/utility room was shelving for storing all my craft stuff. I want to see what I've got and make it easy to get to it. Before I had so much stuff stacked on top or in front of each other I didn't know where anything was. It took so much effort to find things I ended up not even trying.

Because of the low ceilings and the beams we were restricted with height so we chose Ikea Expedit shelving units all along one wall. One 4 x 4 unit and one 5 x 5. They fitted perfectly with room on top of the smaller one for some of my jars and a little chest of drawers. (Btw, they have stopped making the Expedit shelving & replaced it with Kallax range. Same internal measurements but if we hadn't bought the Expedit ones when we did we would have gaps at either end)


I scoured shops and the Internet for boxes that would fit into the cubicles to make the most of the space. I also needed smaller ones that could stack and fill the space.
With tape measure in my hand I found some food storage boxes approx 33 x 33 x 11cm  from Asda for £2 each. Not very pretty but I plan to insert some floral paper down the inside.

Asda Food Storage Box


Next I got 3 Fushia pink boxes with lids from Argos. 45W x 34D x 26H
They stick out a bit but the colour will hide the not so attractive bits & pieces.

Pink boxes from Argos


A friend who runs a cafe/tuck shop gave me some empty sweet boxes which were perfect for smaller collections of items e.g. Hearts - wooden, rusty, buttons, tiny willow wreaths etc. Yet again I plan to insert some pretty paper down the inside at the front. Although I have washed them they still smell of sweets. Quite a pleasant smell I think.

Sweet boxes (think Fizzy Strawberry Laces were in these - yum!)


I bought 3 slightly see through 24L lidded boxes from The Range then I found the perfect fit in B & Q (wish I'd discovered these first!) Expensive, and the clear plastic doesn't seem very good quality, but 2 of the medium boxes stacked on top of each other fit perfectly in a cubicle. 3 of the smaller ones stacked also fit perfectly. These boxes are ideal for my fat quarters, eighths and smaller left over pieces.

B & Q Sweater box

B & Q Shirt box

24L Storage box from The Range


The other cubicles will be filled with some of Ikea's DRONA boxes, books, folders, box files, baskets, tins etc which I will come to soon.
Zx

Tuesday 1 July 2014

My first post! My Craft Room - Part 1


Here I go! My first blog post. I am so excited about my new creative place I can't wait to make something but there is still lots to do to make my room just perfect.

My Creative Place Part 1

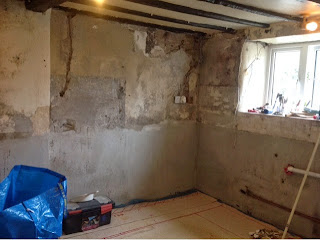
We started gutting what was our old kitchen back in February to make a craft/utility room.
Gutted!

With only weekends really to work on it it has taken us ages. The walls had to be dry lined & waiting for the builder to come & plaster them held us back a bit.
Plastered!
A slate tiled floor was painstakingly put down by my "star" of a husband. Not the easiest of jobs. Each one was of a different thickness so to get them level was murder. They then had to be grouted and sealed. 
After a bit of plumbing a new sink unit was installed with Ikea kitchen units and beech worktops from B & Q. Two deep window sills were made out of the side panels of an old wardrobe.
Neat!
I had the task of doing all the painting. Not an easy or quick job. We have beams which had to be painted black. I would prefer them to be bare wood but it would have been a far too hard & messy job. I could only paint a few at a time as it hurt my neck so much. After lots of searching online for colour inspiration turquoise really appealed to me but I chickened out. I played safe & chose B & Q Antique White Matt Emulsion in the end. The room has a low ceiling with small windows facing east so it can get quite dark especially on dull days so decided a light shade would be better. I still haven't finished all the walls.
....to be cont'd